Advertising Conversion Export
Export conversion data to ad platforms without third-party tracking pixels.
This feature is available on the Premium plan and above.
Overview
The Advertising Conversion Export feature lets you send conversion data from Ghost Metrics directly to your ad platforms. Instead of placing third-party tracking pixels on your site, Ghost Metrics matches ad click IDs to completed goals and generates export feeds that ad platforms can import.
This is especially valuable for healthcare organizations that need to measure advertising ROI while maintaining strict privacy controls. No third-party scripts are loaded on your site, and you control exactly what data leaves your analytics platform.
Supported platforms:
- Google Ads — Automated import via HTTPS feed, or manual CSV upload
- Microsoft Advertising — Offline conversion import via scheduled upload
- Yandex Ads — Manual upload through Yandex Metrica
Navigate to Administration → Websites → Conversion exports to access this feature.
How It Works
- Click ID capture — When a visitor arrives from an ad click, Ghost Metrics captures the click identifier (
gclidfor Google,msclkidfor Microsoft,yclidfor Yandex) from the landing page URL. - Goal matching — When that visitor completes a goal, Ghost Metrics associates the conversion with the original click ID — either from the same visit or, depending on the export’s attribution settings, from an earlier visit.
- CSV export — Ghost Metrics generates a CSV feed containing the matched conversion data (click ID, conversion name, timestamp, and optional revenue and currency).
- Platform import — The ad platform imports the feed and attributes the conversion back to the specific ad, campaign, and keyword that drove the click.
Because the data flows from your analytics platform to the ad network — rather than through a tracking pixel on your site — you maintain full control over what is shared. No third-party JavaScript runs on your pages.
Prerequisites
Enable Auto-Tagging in Your Ad Platform
Click IDs only appear in your landing page URLs if auto-tagging is on:
- Google Ads — Settings → Account settings → Auto-tagging must be enabled so
gclidis appended to your ad URLs - Microsoft Advertising — enable auto-tagging of
msclkidin your account settings
Also confirm your landing pages and any redirects preserve URL query parameters — a redirect that strips ?gclid=... breaks the matching.
Consent and Click ID Storage
When a visitor gives consent, the full click ID is stored. Without consent, only an anonymized click ID is stored — and anonymized IDs can’t be matched by the ad platform. You need a valid legal basis for processing click IDs; coordinate this with your consent banner setup.
You can verify click IDs are being captured in Visitors → Visits Log, where ad-click visits are marked with an icon, and via the Ad Provider and Ad Click ID segments.
Setting Up a Conversion Export
Step 1: Create the Export
Go to Administration → Websites → Conversion exports and click Create new conversion export. Configure:
- Platform — Google Ads, Microsoft Advertising, or Yandex Ads
- Number of days to export data for (excluding today) — Use 3 days if you plan to import daily, or 9 days for weekly imports. Overlapping ranges prevent missed conversions; ad platforms deduplicate.
- Attribution settings — Whether conversions count when the click ID was captured in the same visit only, or also in a previous visit
- Segment (optional) — Restrict the export to a specific visitor segment
Step 2: Map Your Goals
For each goal you want to export, set its Alias name in export. This alias is the conversion action name the ad platform will look for.
Critical: The alias must exactly match the conversion action name configured in your ad platform — capitalization, spacing, and punctuation included. A mismatch means the platform cannot attribute the conversion. (The alias does not need to match the goal’s name inside Ghost Metrics.)
| Ghost Metrics Goal | Alias name in export (must match ad platform) |
|---|---|
| Appointment Request | appointment_request |
| Contact Form Submit | contact_form_submit |
| Patient Portal Signup | patient_portal_signup |
Step 3: Save and Copy the Export URL
After saving, Ghost Metrics generates a unique export URL containing an access token. Copy this URL immediately — the access token is displayed only once. If you lose it, create a new export.
Google Ads Setup
Prerequisites
Before Google Ads will accept imported conversion data, enable data-sharing consent:
- In Google Ads, go to Tools → Data manager → Consent settings
- Under Imported and uploaded data, select Services that can receive data
- Choose All Google services and save
The export feed must contain at least one data row before you connect it in Google Ads — connecting a feed with only headers produces a configuration error. If you have no conversions yet, wait until at least one has been captured.
Step 1: Create the Conversion Action
-
In Google Ads, click Goals in the left navigation to open the Summary page
-
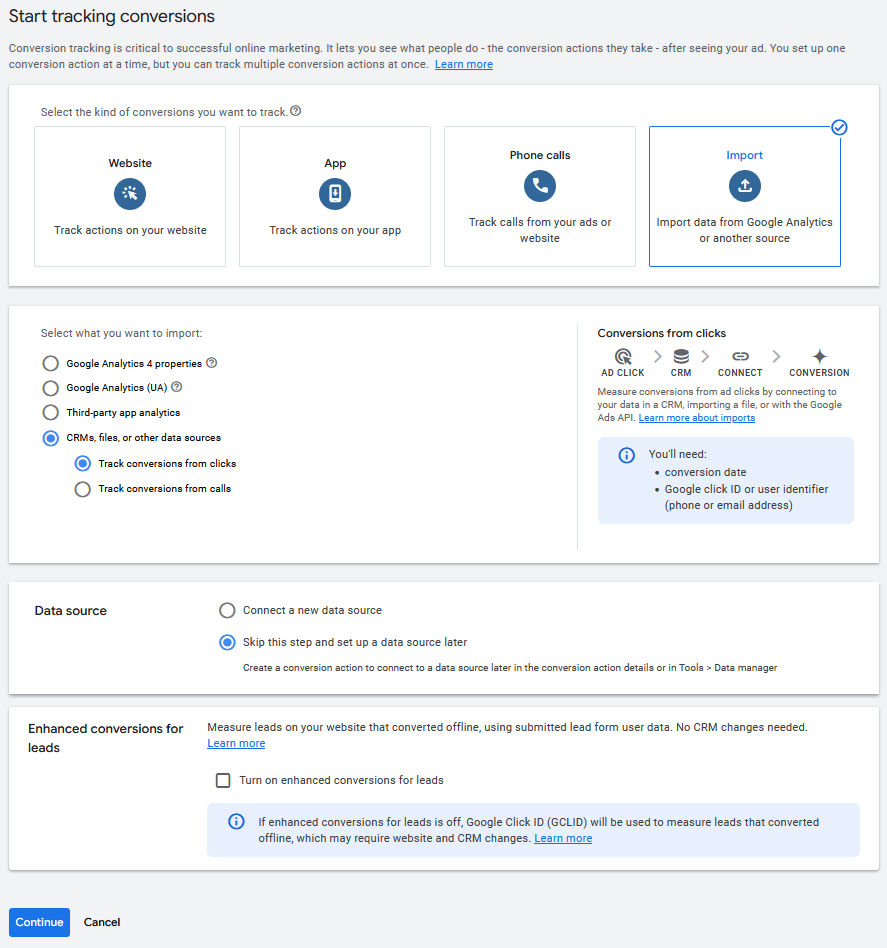
Click + Create conversion action and choose Import
-
Select CRMs, files, or other data sources, then Track conversions from clicks
-
Under Data source, select Skip this step and set up a data source later, then click Continue
-
Enter the conversion action name — exactly the alias you configured in Ghost Metrics — and adjust the category, value, count, and attribution settings as needed
-
Click Save and continue, then Done
Google recommends waiting 4–6 hours after creating a new conversion action before the first upload runs against it.
Step 2: Connect the HTTPS Feed
-
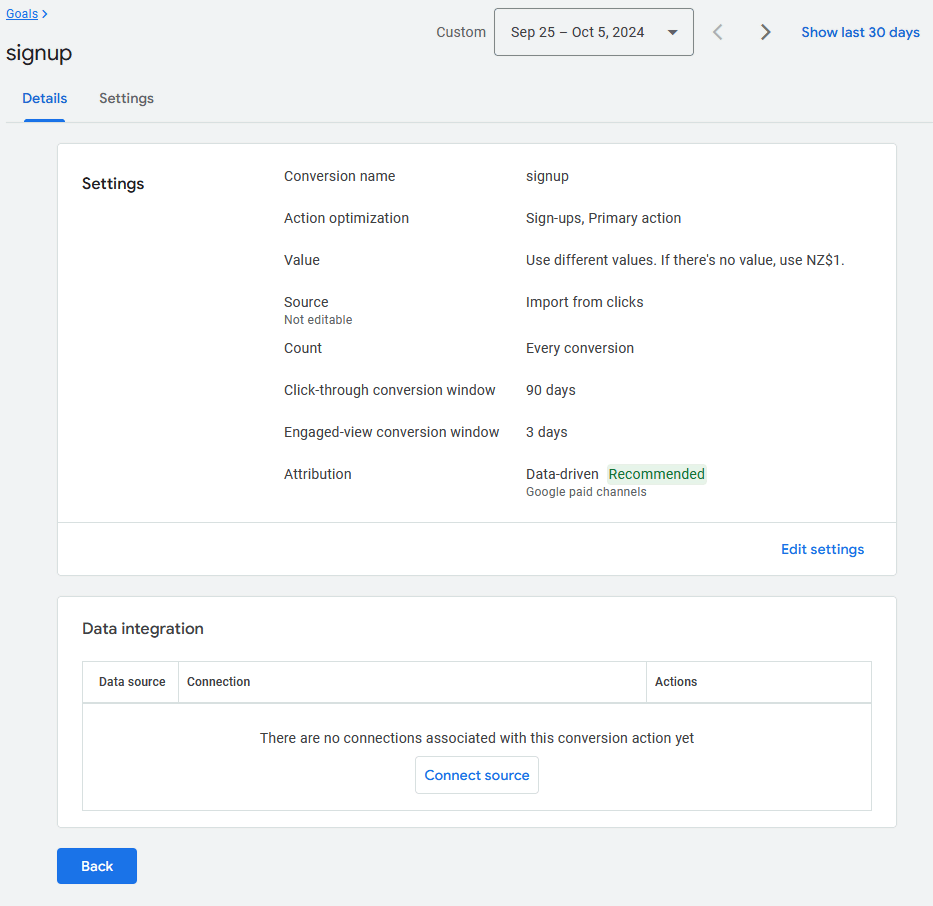
Open the new conversion action from the Summary page
-
In the Data integration section, click Connect source
-
Select HTTPS as the source
-
Review Google’s consent and data policies and check the box under Customer data, then click Continue
-
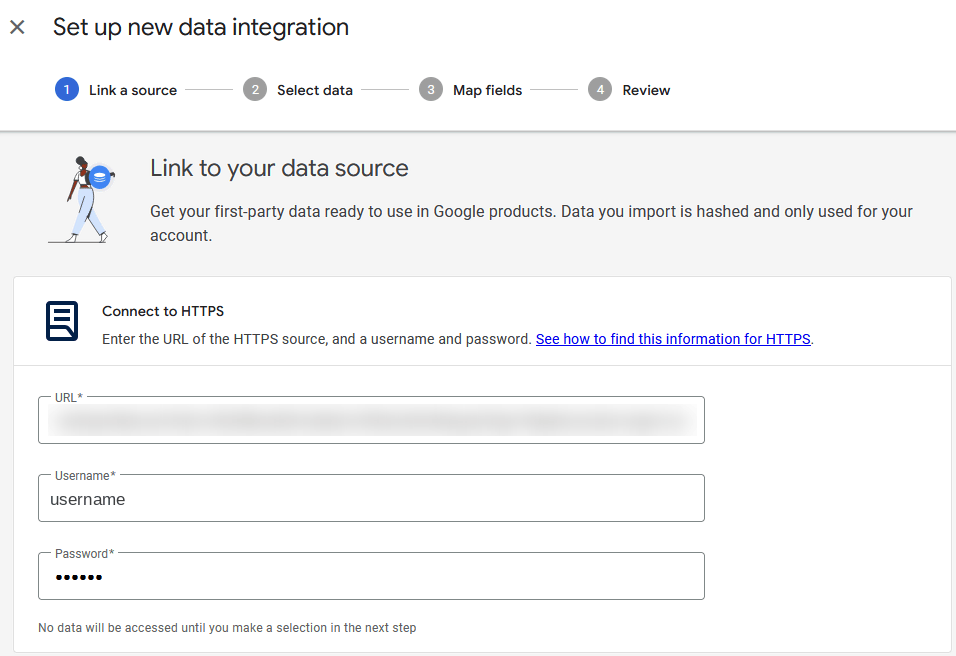
Paste the export URL from Ghost Metrics and append
&requestType=https&conversion-export.csvto the end (Google requires the URL to end in.csv) -
Enter any arbitrary values for Username and Password — the fields are required but not validated
-
Continue through the wizard steps — Link a source → Select data → Map fields → Review — mapping the source fields to Google’s fields (e.g.,
gclid, conversion event time) -
Click Finish
Google Ads will now pull conversion data from Ghost Metrics automatically on its own schedule.
Alternative: Scheduled Upload (Legacy)
Google Ads also offers a legacy scheduled-upload mechanism:
- Go to Goals → Conversions → Uploads and open the Schedules tab
- Click the + button and select HTTPS as the source
- Paste your export URL (with the
&requestType=https&conversion-export.csvsuffix), enter arbitrary username/password values, and set the frequency (daily recommended) - Click Save & Preview
Results appear in the Uploads tab after each run. For one-off imports, the same Uploads screen accepts a single manual HTTPS pull or CSV file upload.
Microsoft Advertising Setup
Step 1: Create an Offline Conversion Goal
- In Microsoft Advertising, go to Tools → Conversion tracking → Conversion goals
- Click Create conversion goal
- Choose Offline as the conversion type and pick a goal category
- Set the interaction type to Offline conversions
- Enter the goal name — exactly the alias configured in Ghost Metrics (it doesn’t need to match your Ghost Metrics goal name)
- Configure revenue, scope, count, and the conversion window, then save
Step 2: Configure the Export in Ghost Metrics
- Create a conversion export, selecting Microsoft Advertising as the platform
- Map your goals with aliases that exactly match the Microsoft conversion goal names
- Copy the export URL
Step 3: Schedule the Upload
- In Microsoft Advertising, go to Tools → Conversion tracking → Offline conversions and open the Schedules tab
- Click the + icon and paste your Ghost Metrics export URL
- Set the frequency (daily recommended) and set the timezone to match your Ghost Metrics site’s timezone
- Click Save & Preview
Microsoft Advertising will begin pulling conversion data on the configured schedule.
Yandex Ads Setup
Yandex requires setup in Yandex Metrica and manual file uploads.
Phase 1: Configure Yandex Metrica
- Create (or verify) your Yandex Metrica tag for the site
- Create goals with the condition type JavaScript event, using the Ghost Metrics alias as the goal ID
- Enable offline conversions for the tag — the upload option appears in Metrica 1–2 days after enabling
Phase 2: Export from Ghost Metrics
- Create a conversion export, selecting Yandex Ads as the platform
- Map your goals with aliases matching the Metrica goal IDs
- Open the export URL in your browser to download the CSV file
Phase 3: Upload to Yandex
- In Yandex Metrica, go to Settings → Upload data → Offline conversions
- Click Upload offline conversions and choose yclid as the binding type
- Select the CSV downloaded from Ghost Metrics and complete the upload
Repeat this upload whenever you want to sync new conversions — Yandex doesn’t support automated URL-based imports.
Best Practices
Enable Exports Before You Need Them
Click IDs are only stored once the feature is active and an export has been created — there’s no retroactive capture. Set up your conversion exports early so click ID data is ready when you need it.
Use Overlapping Date Ranges
Configure the export to include more days than your import frequency (3 days for daily imports, 9 for weekly). Ad platforms deduplicate conversions, so overlap is safe and prevents gaps.
Match Names Exactly
The alias in Ghost Metrics must be identical to the conversion action name in your ad platform. Even small differences in capitalization, spacing, or punctuation mean the conversions simply won’t be attributed.
Store Export URLs Securely
Export URLs contain access tokens that grant read access to your conversion data. Treat them like passwords: store them in a credential manager and don’t share them over unencrypted channels. If a URL may have been exposed, delete that export and create a new one.
Handle Marketing Consent Separately
Ghost Metrics manages analytics consent, but ad platforms have their own consent requirements (such as Google Consent Mode). Consent information is not passed along in the export — handle ad-platform consent independently.
Limitations
- No retroactive exports — Click IDs are only captured after the feature is active and an export exists.
- Today is excluded — Exports cover full days only, and days are defined in UTC (00:00:00–23:59:59 UTC). Depending on your timezone, a “day” in the export may not line up with your local calendar day; conversions appear in the feed once their UTC day has ended.
- Yandex requires manual uploads — Unlike Google Ads and Microsoft Advertising, Yandex doesn’t support automated URL-based imports.
- Facebook/Meta and LinkedIn aren’t supported — their click IDs (
fbclid,li_fat_id) are detected for reporting, but conversion export to those platforms isn’t available. - Click ID anonymization — If a visitor’s click ID was anonymized due to missing consent, it can’t be matched by the ad platform.
Troubleshooting
”Conversion with this timestamp and GCLID already exists”
This Google Ads message means the conversion was already imported in a previous upload — expected when using overlapping date ranges, and Google won’t double-count it. If the errors bother you, reduce the overlap so each export covers only days not previously imported.
”No conversion action with that name in the associated account”
The alias in Ghost Metrics doesn’t match any conversion action in Google Ads. Check that:
- The conversion action exists in Google Ads
- The name matches exactly (case-sensitive, no extra spaces)
- The conversion action is in the correct Google Ads account
”Invalid configuration: The data type or schema of the data source could not be determined”
The feed has only headers and no data rows yet. Wait until at least one conversion has been captured before connecting the feed.
Exported Click IDs Show as “Anonymized”
Click IDs were anonymized because the visitor didn’t provide consent, or the export didn’t exist yet when the visitor arrived:
- Create the export (and configure your goals) before the campaign traffic you want to measure
- Review your consent flow to confirm full click IDs are stored for consenting visitors
Today’s Conversions Not Appearing in the Feed
Expected — exports cover completed UTC days only. If you’re ahead of UTC, wait until after 01:00–02:00 local time for the previous UTC day to be complete.
Next Steps
- Goals — Set up the conversion goals that feed into your ad exports
- Funnels — Analyze the paths visitors take before converting
- Session Recordings — Watch how ad traffic interacts with your site